
Traveling with a disability can be extremely stressful and when you’re dealing with vision impairments, navigating through a bustling airport can be a true challenge. But there are a number of laws and procedures in place that can make this experience much less stressful and daunting.
In this article, I’m going to provide some helpful information and tips for traveling through airports and taking flights while visually impaired. I’ll explain how to notify the airlines regarding your limitations and what type of assistance you can expect to receive for yourself or for someone you’re helping to assist.
Disclosure: This article contains NO sponsorships or affiliate related products in any way.
Table of Contents
Know your legal rights and protections
Maybe it’s the inner attorney in me, but I like to start things out with the law. In the case of flying with a disability, the law is definitely on your side. In fact, the Air Carrier Access Act has you covered in many different areas and I’ll highlight a few of these key summary points taken from the DOT.
Can’t refuse transportation
- Airlines may not refuse transportation to people on the basis of disability.
- Airlines may exclude anyone from a flight if carrying the person would be inimical to the safety of the flight. If a carrier excludes a person with a disability on safety grounds, the carrier must provide a written explanation of the decision.
Notification not required
- Airlines may not require advance notice that a person with a disability is traveling. Air carriers may require up to 48 hours’ advance notice for certain accommodations that require preparation time (like a respirator hook-up).
No limitations on disabled persons
- Airlines may not limit the number of persons with disabilities on a flight.
Solo travel allowed
- Airlines may not require a person with a disability to travel with another person, except in certain limited circumstances where the rule permits the airline to require a safety assistant.
Seat selection
- Airlines may not keep anyone out of a specific seat on the basis of disability, or require anyone to sit in a particular seat on the basis of disability, except to comply with FAA safety requirements (like exit rows).
There are also special protections for service animals but I’ll talk about those in-depth below.
Notify the airlines
While advanced notice to the airlines is not required, if you need any level of assistance it helps if you notify agents regarding your needs at the various stages through the airport, such as ticketing, baggage, security, and boarding. In fact, many airlines insist on you doing this.
For example, Southwest states:
Customers who are blind or have low vision and require assistance must identify themselves and the type of assistance they require upon arrival at the airport, at the gate, onboard the aircraft, at any connection points, and at the destination.
But before you ever arrive at the airport, you also should indicate on your flight reservation that you’ll be in need of assistance for vision impairment.
Most airlines allow you to do this at the time of making your reservation. Typically, you’ll need to do this by finding a special tab to click on on the page where you will input your personal details, such as your name and contact information.
To give you a sense of what to expect, I’ll show you how to do this for each major domestic airline below.
American Airlines
After selecting your travel dates and your fare, continue through the booking process until you get to the page requesting passenger details. There will be a tab that says “Add special assistance.”
Click on that and then there will be a pop-window with more options. You’ll need to select “Special assistance needed at the airport” and then “Blind / low vision assistance.”

Delta
Delta does things different from the other US airlines. For sighted assistance, fill out the Accessibility Service Request form in “My Trips” after you have made your reservation. Once you access that request form, you’ll se the fields that you need to select as shown below. With Delta, you can request the specific type of assistance needed.

Also, though not required, Delta does request that customers notify them if they are traveling with a service animal.
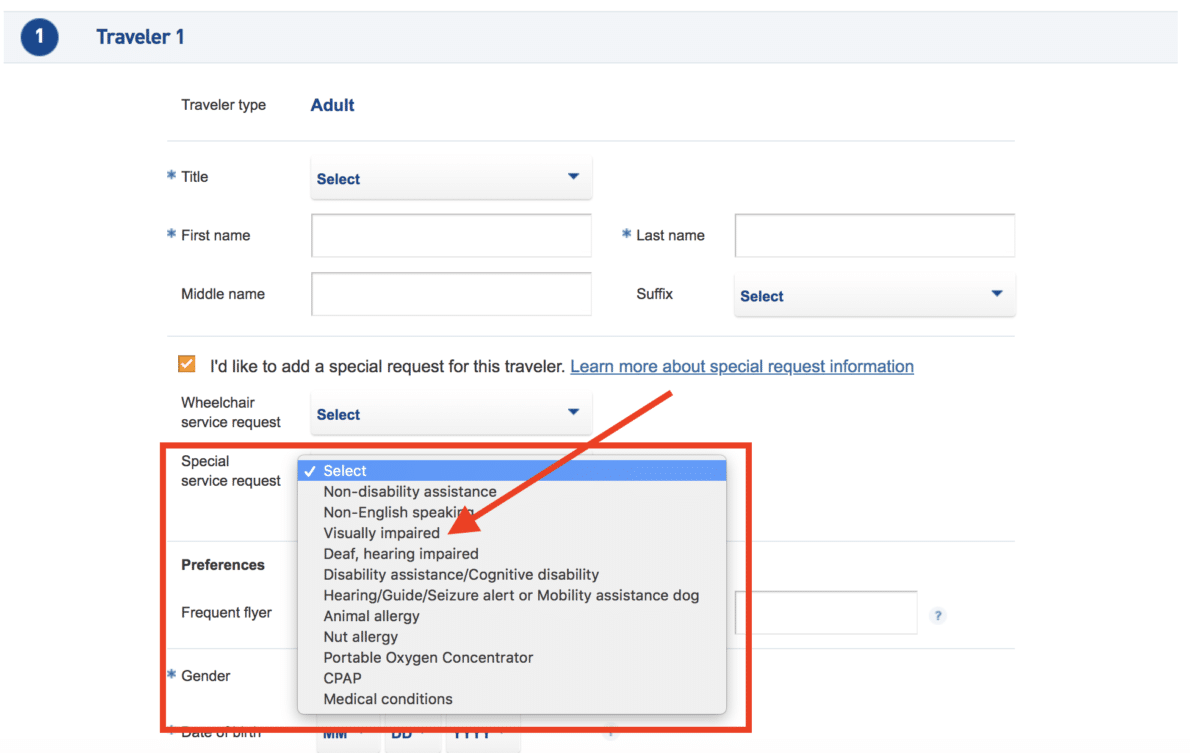
JetBlue
After selecting your flight and the fare, you’ll be taken to a page to enter in your personal details. This is also the page where you can indicate that you’ll need special assistance. Check the box for “I’d like to add a special request for this traveler” and then select the drop down menu for “Special Service Request” where you can select “Visually Impaired.”
Southwest
After selecting your flight and the fare, you’ll be taken to a page to enter in your personal details. This is also the page where you can use the “Special Assistance” link to indicate that you require assistance. If you’re making a booking you’ll find this option on the “Passenger & Payment Info” page as shown below.

United
After selecting your flight and the fare, you’ll be taken to a page to enter in your personal details. This is also the page where you can indicate that you’ll need special assistance. Simply click on the field to enter the passenger information and then you’ll see a drop-down menu near the bottom for “Special travel needs (Optional).”

If you have a disability and require special seating to accommodate your disability, you will have an opportunity to request special seating through Manage Reservations or by going to United’s seating accommodations webpage after you have completed your reservation.
Getting through the airport on your own
If you’re planning on traveling through the airport solo, you might want to do some research on the layout of the airport to the extent possible.
It will be a good idea to get familiar with:
- The airport terminals
- Different levels of the terminals
- Check-in areas
- Help desks
- Security
- Bathrooms
- Food courts and restaurants
- Shops
Start by locating the terminal for the airport that you’re flying in and then mentally map out where you might need to go. Once you’re checked in, you should be able to see your gate but note that the gate locations are subject to change.
Also, get a sense of what type of transportation exists between terminals. Sometimes you can walk between terminals without an issue but other times you’ll have to exit the airport and then re-enter through security. Also, some airports will have automated people movers so you won’t have to do as much walking.
You might also want to look into the Nearby Explorer App with its “Indoor Explorer” feature that acts like an audio guide that can tell you exactly where you are in an airport, step by step.
Another program is Aira, which allows you to get real-time assistance via smart glasses and smartphone software that connects to remote live agents.
Getting assistance through the airport
There are two main ways you might get assistance through the airport when flying. The first is with a non-passenger escort which is likely someone that you know and can trust that can assist you and the second is by requesting special assistance from an airline agent.
I’ll go over both of these below.
Non-passenger escort
A non-passenger escort pass (NPE) is a special pass that allows someone to accompany you through TSA security who is not flying. This is offered not only to the disabled but also to minors and even to military personnel heading out to war zones.
With an NPE, a companion can accompany you all the way up to boarding and they also can accompany you from the point of arrival at the gate. They will need to show a government-issued ID at the ticket counter and it’s best if the two of you are together and they have your itinerary details.
Two important things you need to note about NPEs:
- If the flight arrival occurs after security checkpoint has closed for the evening, then the airline will not be able to provide a NPE pass. So always consider the timing of flights and try to schedule flight arrivals for normal business hours if possible if you think you’ll be in need of an NPE pass.
- Also, NPEs are NOT issued for people meeting passengers on incoming international flights back into the US, due to customs and immigration rules and regulations.

Assistance from an airline agent
Airlines allow you to receive assistance during every step of your travel including:
- From the point of arrival at the airport’s curb
- Check-in
- Security
- Traveling through the terminal
- Locating connections
- Boarding
- Arrival
- Luggage
- Getting to pick-up
You just need to make sure you that you put the airline on notice that you will be traveling with a vision impairment with the steps described above. In addition to putting the airlines on notice via your reservation, you should feel free to call them at any time to clear up any questions that you might have.
You can also contract TSA Cares for disability-related questions:
- Email TSA Cares
- Call them at: (855) 787-2227 (Call 72 hours prior to traveling)

Traveling with your mobility cane
If you depend on a mobility cane to any degree, you’ll want to think about a few things when making your way through the airport.
Getting through security
Your mobility cane may have to be put through the x-ray machine when making your way through security. However, TSA should give you your cane back before you have to proceed through the metal detector.
This means you can use your cane to get through the metal detector, but if you set off the detector you’ll likely be subject to a body scan with a hand metal detector/wand along with a pat down and your cane might be inspected/swabbed.
If you want to avoid this you can request a TSA agent to guide you through the metal detector without your cane and you won’t be subject to additional screening unless you trigger the alarm. Your cane will likely still be inspected or x-rayed, though.
Storing your cane onboard
Once you’ve boarded, you may not be able to store your cane in the overhead bin if it’s too long. In those cases, you’ll want to store it under the seat in front of you.
If you take a window seat you can utilize the wall of the plane (fuselage) and store your cane along the wall. This will help it to not interfere with other passengers — just try to keep a foot on it to keep it from sliding up and down the cabin during take-off and landing.
Another option could be the closet found in some cabins for coats. Simply ask the flight attendant if that’s a possibility and they should be able to bring it back to you just before arrival.
When in doubt
If you’re not fully dependent on your cane, you might still consider bringing it with you because many report that traveling with a white cane make life easier because it puts others on notice of your potential sight limitations.
Some find that it also adds “legitimacy” for those who only have limited eyesight impairments since some people can unfortunately be reluctant to acknowledge your disability without “proof.”
Service animals/guide dogs
Airlines will allow your guide dogs to fly with you for no additional cost.
Most airlines classify service animals as those who have been trained to perform a specific task to assist the customer traveling such as pathfinding, providing stability, alerting to sounds, etc. So animals trained to assist with vision impairments certainly fall into this category.
By law, the airlines are required to accept the following types of identifications for service animals:
- Identification cards
- Other written documentation
- Presence of harnesses
- Tags
- Credible verbal assurances of a qualified individual with a disability using the animal
However, if they refuse to accept your guide dog, the airline must explain the reason for the decision to the passenger and document it in writing. A copy of the explanation must be provided to you either at the airport, or within 10 calendar days of the incident.
There are also a couple of additional protections that you have:
- Airlines can’t deny a service animal on the basis that it may offend or annoy passengers
- Airlines must permit the service animal to accompany you at any seat, unless exceptions apply
- If a service animal cannot be accommodated at your seat, the airlines must offer you the opportunity to move with the animal to another seat location, if present on the aircraft, where the animal can be accommodated.
Read more about laws governing service animals here.
Typically, the restrictions for service animals are lower than those for emotional support animals. For example, you typically have to submit paperwork 48 hours prior to departure for emotional support animals and are limited to a single animal.
The restrictions for service animals are pretty similar across the board but below are some of the key points for the service animal policies for the different airlines. Also, if you want to look more in-depth at each airline you can follow the link at the bottom of each section to the webpage dedicated to service animals.
American Airlines
- Animals must be able to fit at your feet, under your seat or in your lap (animals to be seated on lap must be smaller than a 2-year old child).
- For safety reasons, you won’t be able to sit in an exit row when traveling with your service or emotional / psychiatric support animal.
- On flights over 8 hours, documentation is required stating your animal won’t need to relieve itself or can do so in a way that doesn’t create a health or sanitation issue.
Read more about the American requirements for service animals here.
Delta
Delta has the following recommendations when it comes to service animals:
- Travel with the animal’s Veterinary Health Form or Immunization Record on your person
- While not required, we request passengers fill out the Trained Service Animal PDF (submit at least 48 hours before your flight)
- Upload it to My Trips through the Accessibility Service Request Form
- On Delta flights, service and support animals are expected to be seated in the floor space below a passenger’s seat or seated in a passenger’s lap.
- The size of the animal must not exceed the “footprint” of the passenger’s seat.
- Service and support animals under four months of age are not allowed on any flight due to rabies vaccination requirements.
Read more about the Delta requirements for service animals here.
JetBlue
Here’s what JetBlue has for its service animal requirements:
- Please add the animal to your reservation when booking online or notify JetBlue at 1-800-JETBLUE (538-2583) of the animal’s travel.
- If you are traveling with more than one service animal, JetBlue will make every reasonable effort to accommodate the space needed.
- Your animal(s) must fit within the footprint of your seat(s).
- All animals must remain on the floor; however, if the animal is no larger than a lap infant and is well-behaved, circumstances may permit the animal to remain in your lap.
- Service animals in training are not accepted for travel on JetBlue.
Read more about the JetBlue requirements for service animals here.
Southwest
Southwest Airlines welcomes trained dogs, cats, and miniature horses as service animals onboard our flights as long as the Customer is able to provide credible verbal assurance that the animal is a trained service animal. Southwest Airlines does not accept unusual or exotic species of animals.
Read more about the Southwest requirements for service animals here.
United
- The animal is expected to be seated in the floor space below your seat
- The animal should not extend into the aisles
- The animal must behave properly in public and should follow directions from its owner
- Contact the United Accessibility Desk at 1-800-228-2744 if you have any questions or special requirements
Read more about the United requirements for service animals here.
International travel with service animals
NOTE: If you are traveling out of the country or to Hawaii you need to be careful about special requirements regarding quarantine of your animals.
You should contact the appropriate consulate or embassy at least four weeks before departure to make sure that all necessary procedures are followed. You might need to abide by these regulations even if you are just passing through an airport.
To check on the requirements for visiting foreign countries with animals you can check the USDA website here.
Getting through security with your service animal
Once you approach the TSA screening area, be sure to notify them that your animal is a service animal so that there is no confusion (even if it should be obvious).
You can choose which way you think it best for getting through TSA security with your service animal. You basically have three options:
- Allow your dog to go through first (preferably while on a leash)
- Allow your dog to go through after your (preferably while on a leash)
- Go through security together (holding your animal or with it on a leash)
Try to suggest your preferred method to the TSA agents if they don’t recommend it.
If you walk through together and the metal detector goes off you and your service animal will be subject to additional screening, including pat downs and the animal will be subject to the inspection described below.
If the animal sets the alarm off by itself, it will be subject to a closer inspection. The TSA agent should request your permission to inspect your animal and then proceed to take a close look at it, including items like its leash, collar, harness, backpacks, vest, etc.
You should not have to remove any of those items from the animal but if there are screening issues, they might (in rare circumstances) request for you to remove some of those items.
When dealing with TSA, try to be as patient and polite as possible but if you run into issues with security consider the section below for resolving those.
Also, you might want to consider programs like TSA Pre-Check and CLEAR which will generally allow you to avoid longer lines and get through security much quicker for a much less painful experience.
Tip: There is a “Where to Go” app for Apple or Android that can help you find airport dog relief areas.
Complaint Resolutions Official (CRO)
Each air carrier is required to have one or more designated Complaint Resolutions Official (CRO) on site or available by phone. The officer should have a thorough understanding of the Air Carrier Access Act (ACAA) and the carrier’s policies and procedures related to 14 CFR Part 382, which can cover things like: services, facilities, and accommodations for passengers with disabilities.
So this is someone who is there to help to resolve any issues you might encounter when navigating through the airport related to your disability. For example, if you are given trouble regarding a guide dog or because you’re traveling with some type of medical equipment, you may want to request to see a CRO.
You’ll first want to try to resolve the issue with a TSA agent/airline’s agent or a “passenger support specialist”/supervisor but if you’re not able to do that and you don’t feel like the conversation is going to go anywhere then request to contact a CRO.
Boarding
Airlines should allow you to board first before any other passenger boarding groups. However, you need to make sure to notify the airlines prior to your flight so that they will be on notice to provide you with this privilege.
You might also request for the airline to give you time to become acquainted with the plane so that you can get a feel for your proximity to the lavatory and the emergency exit. (As someone with a pre-boarding disability, you won’t be allowed to sit in the emergency exit rows to prevent any potential issues).
Before your flight, it’s also a good idea to check Google Flights or your itinerary to see what type of aircraft you’ll be flying on. You can then check a website like SeatGuru to view the layout of the airplane cabin. You can memorize exactly how many seats you’ll be from the lavatory and emergency exit row and that should help you make your way through the cabin easier.
You can also request for assistance with things like snack and drink menus and request an emergency card in braille if needed.
Luggage
Before embarking on your flight, there are a few things that you can do to make things easier for retrieving your luggage.
Obviously, the first thing you might want to consider is only taking a carry-on with you to avoid the hassle of picking up luggage in the first place.
Many airlines don’t impose a strict limit on the weight of your carry-on so as long as you fit your belongings in your carry-on bag and/or personal items bag (such as a small backpack) and the weight isn’t ridiculous, you won’t have to worry about checking bags.
Be on the lookout for basic economy fares though since those make you pay for carry-ons, as do some low-cost carriers, such as Frontier and Spirit.
I would suggest going with luggage that sticks out in color and that you could easily describe to someone (e.g., “the large orange bag with white strips” or something along those lines). Or perhaps you have a special luggage tag that you know the feel of.
Another tip is to look into a “luggage locator” which allows you to set up a transmitter in your bag that beeps when you get in close proximity.
And don’t forget, the airlines will assist you with getting your luggage if needed.
Final word
As you can see, traveling through the airport and flying with a vision impairment doesn’t have to be as daunting of a task as you might think it could be. But you need to take the necessary steps to make sure things will go smoothly like seeking out assistance if needed and notating your disability on your boarding pass if needed.
H-Town based Attorney turned credit card rewards expert. Founder of UponArriving.com.